Building your own video game console might sound like a complex task, but with the right guidance and open-source tools, this rewarding project is within reach for many enthusiasts. Creating a DIY gaming system lets you customize your gaming experience while learning valuable skills in electronics and programming.
Getting started with diy video game console building
The world of DIY gaming consoles offers many exciting possibilities, from retro gaming emulators to fully customized handheld devices. Several platforms provide excellent starting points for beginners, including Raspberry Pi, Arduino-based systems like Gamebuino and Arduboy, or specialized kits such as CircuitMess Nibble, MAKERbuino, Pokitto, and GameShell.
Necessary hardware components
To build a basic DIY gaming console using Raspberry Pi, you'll need specific components: a Raspberry Pi 3 Model B+ or Model B, a protective case (Flirc cases work well), a 64GB Class 10 Micro SD card for storage, a 5V 3A power supply, an HDMI cable for display connection, a Bluetooth or USB controller (Nintendo Wii U Pro controllers are popular choices), and temporarily, a USB keyboard for initial setup. Other platforms like Arduino require different components, but many predesigned kits include everything needed.
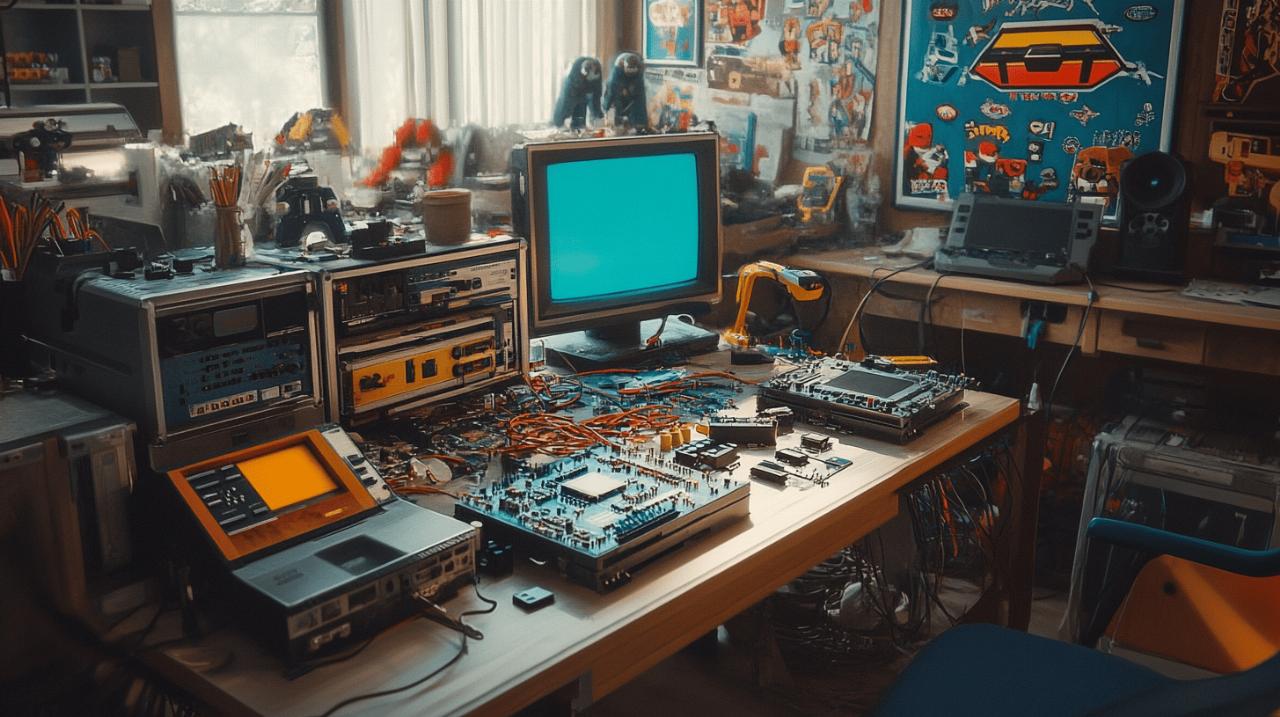
Setting up your workspace
Before beginning your build, organize a clean, static-free workspace with proper lighting. Keep your components organized and have the right tools accessible – screwdrivers, tweezers, and possibly a soldering iron depending on your project. For software installation, prepare by downloading necessary files like RetroPie (a popular emulation system for Raspberry Pi that includes over 50 pre-installed systems). Plan your build process by reviewing tutorials specific to your chosen platform, whether from online resources or books like the Dunod-published guide on open-source console construction.
Selecting the right open source tools
Building your own video game console is an exciting DIY project that combines hardware tinkering with software development. The world of open-source gaming offers numerous platforms that make this process accessible even to beginners. With options ranging from Raspberry Pi-based systems to Arduino microcontrollers, you can create anything from retro gaming machines to unique handheld devices.
When embarking on your DIY gaming console journey, it's essential to select tools that match your skill level and desired outcome. Many makers start with pre-existing frameworks like RetroPie that simplify the process while still allowing for customization.
Popular software platforms
RetroPie stands as one of the most widely used platforms for DIY game consoles. Built for Raspberry Pi, it comes with over 50 pre-installed emulation systems, making it perfect for retrogaming enthusiasts. Setting up RetroPie involves placing your Raspberry Pi (preferably Model B+ or Model B) in a suitable case like the Flirc case, installing the RetroPie software on a 64GB Class 10 Micro SD card, and connecting peripherals including an HDMI cable and controllers.
Beyond RetroPie, several specialized platforms exist for different hardware configurations. GameShell offers a modular approach to console building, while Pocket C.H.I.P. provides a unique form factor with a built-in keyboard. For those interested in more compact solutions, platforms designed for Arduboy, Gamebuino META, and Pokitto offer streamlined experiences focused on specific types of games. While not open source, Pico-8 is worth mentioning as it demonstrates that using open-source hardware doesn't restrict you to particular software ecosystems.
Game transfer to your DIY console can be accomplished through various methods. With RetroPie, you can use either a FAT32-formatted pen drive or SFTP for transferring game files securely over your network.
Programming languages to consider
Choosing the right programming language for your DIY gaming console depends on both the hardware platform and your programming experience. For Arduino-based consoles like Arduboy, Gamebuino, or Makerbuino (and its simplified version Nibble by CircuitMess), the Arduino programming language based on C++ is typically used.
Lua programming is another popular choice for game development on DIY consoles. Its simplicity makes it ideal for beginners while still offering enough power for creating engaging games. Many resources and tutorials exist for coding simple games like Pong and Snake using Lua or Arduino.
For Raspberry Pi-based systems, you have more flexibility in programming languages. Python is widely used due to its readability and extensive libraries. C/C++ remains valuable for performance-critical applications, while JavaScript might be appropriate if you're developing web-based games.
Some platforms like STM32 and ESP32, suggested by DIY gaming enthusiasts, offer alternative hardware options with their own programming environments. These may provide performance benefits or cost advantages depending on your specific project goals.
Step-by-step assembly process
 Building your own video game console is an exciting project that combines electronics, programming, and design skills. With the rise of affordable components like Raspberry Pi and Arduino, DIY gaming has become accessible to hobbyists of all skill levels. Let's dive into the detailed process of assembling your own open-source game console.
For a basic but powerful retro gaming console, you'll need these essential materials: a Raspberry Pi 3 Model B+ or Model B, a protective case (Flirc cases work well for heat dissipation), a 64GB Class 10 Micro SD card, a 5V 3A power supply, an HDMI cable, and a Bluetooth controller such as the Nintendo Wii U Pro controller. A USB keyboard will be needed temporarily for initial setup.
Start by placing your Raspberry Pi into its case for protection. Next, download and install RetroPie, a popular emulation system that supports over 50 gaming platforms out of the box. The installation process involves writing the RetroPie image to your SD card, inserting it into your Pi, and powering it on for the first-time setup. During configuration, you'll connect your controller, set up Wi-Fi, and customize additional emulators based on your preferences.
Getting games onto your new console can be done through two main methods: using a FAT32-formatted USB drive or transferring files via SFTP (Secure File Transfer Protocol). Both methods are straightforward and allow you to expand your game library easily.
Circuit board construction techniques
If you're looking to build a more customized gaming experience, working directly with circuit boards offers tremendous creative freedom. Several open-source projects provide detailed instructions for creating handheld consoles from scratch.
Arduino-based consoles like Arduboy, Gamebuino META, and MAKERbuino offer excellent entry points for beginners. These projects typically involve soldering components onto PCBs (Printed Circuit Boards) according to specific schematics. The CircuitMess Nibble, a simplified 32-bit version of the MAKERbuino, is particularly beginner-friendly while still offering genuine circuit-building experience.
More advanced options include the Pokitto and GameShell, which require more intricate assembly but deliver enhanced gaming capabilities. When working with circuit boards, proper soldering technique is crucial—maintain a clean workspace, use the right temperature for your iron, and practice on scrap components before tackling your main project.
Each component placement matters, so follow build guides meticulously. Many open-source console communities provide troubleshooting support if you encounter issues during assembly. Once your circuit board is complete, you can program simple games directly using platforms like Lua or the Arduino IDE, with classics like Pong and Snake being perfect starter projects.
Case design and 3d printing options
The physical housing of your DIY game console greatly impacts both aesthetics and functionality. Creating a custom case elevates your project from a bare circuit board to a polished gaming device.
3D printing has revolutionized case design for DIY electronics projects. Free and open-source 3D models for various console configurations are widely available online, or you can design your own using software like Blender or TinkerCAD. When designing, consider factors such as button placement, screen visibility, battery access, and proper ventilation to prevent overheating.
For Raspberry Pi-based consoles, pre-made cases like the Flirc offer excellent heat management, though they lack the personal touch of custom designs. If you're building an arcade-style setup rather than a handheld, you might consider constructing a miniature cabinet using wood or acrylic sheets, complete with joysticks and arcade buttons for an authentic experience.
The case design phase also presents an opportunity to incorporate practical features like extended battery compartments, custom controller mounts, or even cooling solutions for overclocked systems. Many builders add personal flourishes through vinyl decals, custom paint jobs, or LED lighting to make their creation truly unique.
When 3D printing your case, PLA filament offers a good balance of durability and ease of use for beginners, while ABS provides better heat resistance for components that might run hot. Remember to design or select a case that allows access to all necessary ports and features of your chosen platform.